When choosing a media PC mouse that digs deeper into "I want to know", based on technology and people, I tried to measure the performance from Logitech to 100 yen shop items.
スキャナーやプリンターはもちろん、最近ではスマホやタブレットなどの高解像度液晶などでも見かける「dpi」(「DPI」と大文字で書かれることもあります)。「dots per inch」の略で、意味としては「1インチあたりのドット数」という密度を表す単位です。
例えば、100dpiという密度を考えてみましょう。スキャナーの場合は、1インチを100分割して認識するということになります。つまり、dpiが高ければ高いほど、より細部までしっかり読み取ることができるのです。
プリンターの場合は、1インチあたり100個のドットを印刷できるということになります。1文字が16ドット幅であれば、1インチに約6文字入るという計算です。こちらも数値が高くなるほど細部まで表現できるので、「高dpi=美しい」という単純な考えができます。
液晶の場合も同じです。100dpiだと、RGB各色で構成されているドット(ピクセルと呼ばれることもあり、この場合は「dpi」ではなく「ppi」という表記になりますが、意味は同じです)が、1インチの間に100個並んでいることになります。
dpiが高くなるほど細部まで表現できるのはスキャナーやプリンターと同じなのですが、数値が高くなるとドットが見えにくくなり、文字が小さすぎて読めないといったことが起こります。このため、高dpiとなる高解像度液晶の場合は、16ドットの文字を24ドットで表示するというふうに情報量よりも美しさを重視した設定で使用することをオススメします。
では、マウスのdpiはどうでしょうか。マウスの場合は、1インチ動かしたときに認識できる移動量がdpiとなります。例えば100dpiのものは、マウスを1インチ動かすと画面上のポインターが100ドット移動するわけです。つまり、高dpiのマウスになるほど、少ないマウスの移動量で画面上のポインターを操作できます。
より具体的な数値で考えてみましょう。マウスパッドの幅が20センチ、マウスの幅が6センチだとすれば、マウスの稼働幅は14センチ(約5.5インチ)です。100dpiのマウスの場合、このマウスパッド上で左右に移動できるドット数は5.5インチ×100dpiで550ドット。フルHD(1920×1080ドット)の画面だと、マウスを持ち上げて4回動かさなければポインターを端から端まで動かせないということになります。
On the other hand, what about a 1,000 dpi mouse?The amount of pointer on the mouse pad is 5.5インチ×1,000dpiで5,500ドットとなり、マウスパッドの半分もいかないうちに端まで到達できます。マウスの移動量が少なくてもポインターが大きく動くため、高解像度液晶であればあるほど高dpiのマウスの方が操作しやすいといえるでしょう。
ただし、ここで問題があります。少ない移動量でポインターが大きく動くということは、細かな操作がしにくくなるということです。ドット単位の精密な作業をしたい場合は、低dpiマウスの方が有利になります。
しかし、dpiが異なるマウスを使い分けなくてはならないかというと、そんなことはありません。用途に応じて設定を変更できる機能が、OS側できちんと用意されています。Windowsの場合は、「マウスのプロパティ」にある「ポインターオプション」の「速度」で、擬似的にdpiを変更することが可能です。
The slower the speed, the lower the DPI, and the pointer will move slowly.Conversely, the higher the DPI, the higher the DPI, the higher the pointer mouse.
However, be aware that setting the pointer speed to "fast" does not change the physical DPI.If a 100 dpi mouse is treated as a 200 dpi, it will move 2 dots with a movement that can only recognize only one dots, so it can be moved in 2 dots.The precise movement of one dot is not possible.
On the other hand, if it is "late", the recognition is simply thinned, so there is no problem with one dot units.Although the large DPI mice can be handled like a low DPI mouse, it is difficult to handle low DPI mice like high DPI mice.
利用シーンによってポインターの移動速度を変化させたいなら、ボタン1つでdpiが切り替わる可変dpiのマウスを使うというのも手です。高速移動も精密操作もどちらも自由に選べるので、より操作が快適になるでしょう。
「ポインターオプション」では、速度以外に「ポインターの精度を高める」というオプションも選べます。簡単に説明すると、マウスをゆっくり動かしたときはdpiを低くし、速く動かしたときはdpiを高くするという自動調整機能です。高解像度液晶でも高速移動と精密操作を両立できるだけに、うまくハマれば操作感が激的に改善されます。

However, be careful as the speed of the pointer changes depending on the speed of moving the mouse.There is no problem with the function of "on" for general use, such as looking at the web in a browser or creating documents with Office software, but the function is "off" for applications that do not have stable moving volume, such as illustration creation, videos and photos, etc.You should make it.
No matter how much speed you can change, you will not know how much speed will change.Therefore, I would like to verify the speed setting of "pointer option" while measuring the DPI with a small device.
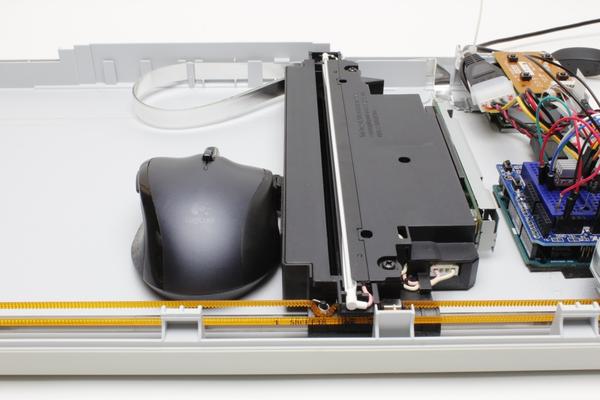
dpiを測る一番簡単な方法は、マウスを動かした距離を定規で測り、その時に移動したポインターの移動量から計算する方法です。しかし、手で動かすとなるとミリ単位で誤差が出てしまう可能性があるため、正確な距離を動かすことができる装置を作ってみました。
使用する装置は、スキャナーを分解して、オープンソースハードウェア「Arduino」でモーター部分を自由に動かせるようにしたものです。スキャナーのヘッドがほぼ平行に動くという機構になっているため、マウスを真横に動かすのに最適だと思い、採用しました。このヘッド部分に両面テープを貼り、マウスが平行になるよう装着しています。なお、スキャナーはジャンク品ということもあり、540円と大変お買い得だったことを付記しておきます。
This makes it possible to move a fixed distance every time, but it doesn't make sense if you don't know how many inches are.So, I fixed the electronic elogis appropriately with hot bonds, double -sided tape, tape, etc., and adjusted it so that I could move just 1 inch.By the way, the moving distance of the mouse at the time of measurement is not 1 inch, but 0.It is 5 inches.This is because if it exceeds 2,000 dpi, the amount of pointer movement will not be able to catch up with a full HD liquid crystal.
To calculate the amount of pointer movement, I used a free software called "MPPUTILITY".Because it is a software that displays the coordinates of the pointer, you can calculate the amount of movement from the start and postponement coordinates.The measurement was performed five times, and the average of the remaining four times was discarded as data.The first time is discarded to eliminate the influence of distortion, misalignment, and head rattling when mouse is fixed.
The mouse to be experimented is Logitech's "Marathon Mouse M705", which was glanced at the equipment photos.It is a 1,000 dpi mouse that I usually use.
「ポインターオプション」の速度設定でスライドバーを1目盛りずつ動かし、そのときの相当dpiを測ることで、速度設定によるdpiの変化を見てみましょう。目盛りは全部で11段階ありますので、左から設定0〜10(中央がデフォルトの設定5)としています。結果をまとめた表は以下の通りです。
| 「M705」(1000dpi)を使った速度設定別dpiの実測値 | |||||||||||
| 設定 | 0 | 1 | 2 | 3 | 4 | 5 | 6 | 7 | 8 | 9 | 10 |
| 実測値(dpi) | 31 | 61 | 248 | 491 | 740.5 | 1,001 | 1,430 | 1,936 | 2,446.5 | 2,936.5 | 3,400.5 |
Set 5 is almost 1,001dpi according to specifications.If the setting increased by 1 from here, it increased around 500 dpi, and when 1 dropped, it decreased around 250 dpi.However, setting 0-1 would be about 30 to 60 dpi because this rule would be 0 dpi.Based on this, I made a DPI table with 100%setting 5.Even if you use other mice such as 800dpi, you can understand the rough DPI by calculating in this ratio.
| 速度設定によるdpiの変化 | |||||||||||
| 設定 | 0 | 1 | 2 | 3 | 4 | 5 | 6 | 7 | 8 | 9 | 10 |
| 速度変化 | 3% | 6% | 25% | 50% | 75% | 100% | 150% | 200% | 250% | 300% | 350% |
先ほども触れましたが、高速化した設定6以上のものは、1ドット単位の移動ができなくなっている疑似dpiです。もしこの速度設定でしっくりくるようであれば、次にマウスを買うときは現在のマウスより高いdpiの製品を買うことをオススメします。
It was a device made with an idea, but I was surprised that it could be measured with surprisingly high accuracy.No, it's not the device.It is the high accuracy of the mouse that is the DPI according to the specifications.
Since we have created a device, let's examine the characteristics of another mouse.The ratio of speed setting will not change, so we will measure only with setting 5.
First of all, 324 yen (tax included) purchased at a 100 yen shop is "high -sensitivity BlueLED mouse" (G208).There is 800 dpi in the specifications, but no matter how you move it, the 1,000 dpi marathon is faster than the mouse M705, and there is a suspicion that the specifications are wrong.
結果は下記の通りで、実測で1,531dpiという、スペック値の2倍近いものでした。そりゃ速く感じるはずです。これはひどい。心なしかポインターの動きもガタガタしているような……と、ここで気が付きました。ポインターの動きを詳しく見てみると、2ドット単位でしか増減していません。つまり、デフォルトで設定7相当となる、200%の疑似dpiとなっているようなのです。
| ダイソー「高感度 BlueLEDマウス」実測値 | |
| 設定 | 5 |
| 実測値(dpi) | 1,531 |
Considering this, the real DPI is half 765.5DPI.Because it is roughly 800dpi, it is not a mistake in terms of specifications.If it is set to setting 3, it can be said that the movement is close to the original DPI.By the way, if it is set 3, it will move in one dot units, but occasionally 2 dots will move, so it will not be stable.If it is a precise movement, it will be difficult if you do not use the optional "increase the precision of the pointer".
Another thing I tried was the variable DPI gaming mouse "Afunta Zelotes T80".At a very low price of 988 yen (tax included), the product that sells is 5 steps that changes 5 steps to 1,000/1,600/2,400/3,200/7,200 dpi.You can change the DPI by pressing the dedicated button under the wheel.
So the result of trying it is as follows, but I was so terrible that I was surprised.
| dpi可変「AFUNTA ZELOTES T80」の実測値 | |||||
| 設定値(dpi) | 1,000 | 1,600 | 2,400 | 3,200 | 7,200 |
| 実測値(dpi) | 832.5 | 1,045 | 2,081 | 2,546 | 4,982.5 |
It should be 1,000dpi 832.There is a difference of nearly 20 % from 5dpi, and 1,600 dpi is 1,045dpi.If it is nearly 40 % different, this will be different.Rather, it should be 800/1,000/2,000/2,500/5,000 dpi.
By the way, if this mouse is set exceeding 1,600 dpi, it will be a pseudo DPI, so it could not be moved in one dot.Also, if you move it slowly, the sensor will be canceled or the pointer does not move.The light click feeling of the button and the fit when gripped were quite impressive, so it is a disappointing result.
I tried it with two cheap products, but there seems to be a reason why cheap ones are cheap.
検証の後半あたりから少し脱線してしまいましたが、高dpiマウスは高解像度液晶でも快適に操作ができ、速度が速すぎても設定で遅くできる分、好みの速度にしやすいというメリットがあります。低dpiマウスの速度を速くすると1ドット単位での精密操作ができなくなりますから、製品選びで悩んだら、高dpiの製品を選んでおくほうが失敗が少ないかと思います。
In addition, "increase pointer accuracy", which increases and decreases the speed of the pointer according to the mouse movement speed, is a convenient function for general software use, but delicate operations such as drawing, CAD operation, and image editing.It seems that it is often an enemy for necessary applications.If you want to match the amount of mouse movement with the amount of pointer, you should use the function "off".
"DPI" is rarely caring, but please check it out the next time you buy a mouse.
Gaming mouse, Afunta Zelotes 7 button 5500 DPI Adjustable USB wired game mouse LED light Windows, iOS, Mac system compatible [parallel imports]
Logitech Marathon Mouse M705
![[Latest in 2022] Explanation of how to register DAZN for docomo with images | 31 days 0 yen free trial reception until April 17](https://website-google-hk.oss-cn-hongkong.aliyuncs.com/drawing/article_results_9/2022/3/28/22149d541c51442b38a818ab134a8cf0_0.jpeg)
!["Amaho no Sakuna Hime" celebrates its first anniversary. The Ministry of Agriculture, Forestry and Fisheries moved to allow you to experience rice farming in a depth unparalleled in the history of games.A rice farming action RPG with over 1 million units shipped worldwide [What day is it today? ]](https://website-google-hk.oss-cn-hongkong.aliyuncs.com/drawing/article_results_9/2022/3/28/378f9ee978fe8784d8ab439d041eee85_0.jpeg)